
Cleaning a ceiling fan is much easier when you remove loose dust before introducing moisture. Turn the fan off, wait until the blades stop completely, and start with a microfiber cloth or pillowcase that can capture debris instead of brushing it into the room.
The method changes when the blades feel sticky or the fixture is too high to reach comfortably. In those cases, use the least aggressive approach that solves the problem and check the fan’s care instructions before applying water or cleaner.
Choose the Right Cleaning Method First
Take a close look at the blades before gathering supplies. Loose gray dust usually needs only dry cleaning, while a darker, tacky film may require a second pass with a lightly damp cloth if the fan’s finish allows it.
Height matters too. If you cannot reach the fixture while staying comfortably balanced, plan to use an extendable duster rather than stretching from furniture or leaning sideways from a ladder.
This quick guide helps match the method to the condition of the fan:
| What you find | Best first approach | Avoid |
|---|---|---|
| Light loose dust | Microfiber cloth or duster | Wetting the dust immediately |
| Heavy dry dust | Pillowcase or microfiber cloth | Brushing debris freely into the room |
| Sticky or greasy film | Dry dusting followed by a compatible damp treatment | Assuming one cleaner works on every finish |
| Fan beyond comfortable reach | Extendable ceiling-fan duster | Chairs, boxes, or overreaching |
Useful supplies may include a microfiber cloth, an old pillowcase, a second clean cloth for damp wiping, and an extendable duster for higher fixtures. If a cleaner is needed, check the model-specific manual or care instructions first. Ceiling fan finishes and blade materials do not all have the same moisture and cleaning-product requirements.
Clean the Blades Without Spreading Dust
A thick layer of dust becomes messy when it is swept quickly from the blade. Instead, try to capture the buildup at the fan so less of it lands on furniture, bedding, or the floor.
For a fan you can reach comfortably, use this sequence:
- Turn the fan off and wait until the blades are completely still.
- Cover furniture or bedding underneath if the blades carry a heavy layer of dust.
- Slide an old pillowcase over one blade so the fabric surrounds both surfaces.
- Hold the fabric gently against the blade and pull the pillowcase toward the tip.
- Repeat on the remaining blades, using a cleaner section of fabric as needed.
- Finish the edges and any missed areas with a clean microfiber cloth.
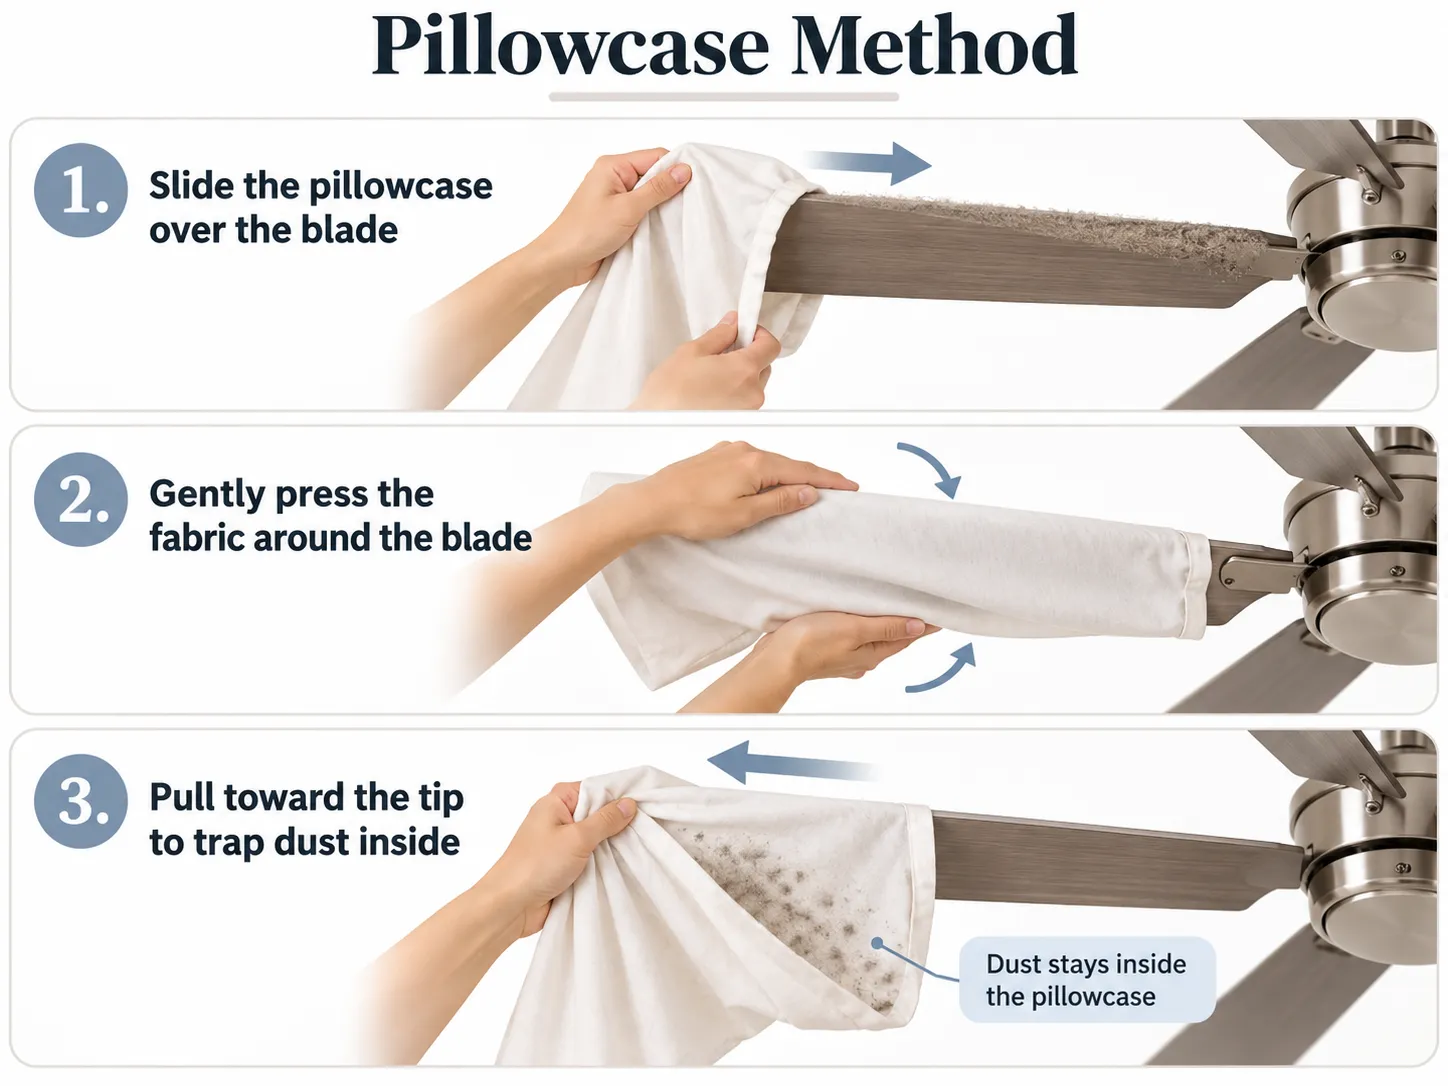
The pillowcase method is particularly useful when dust has accumulated on the upper surfaces where it cannot be seen easily from the floor. Most of the debris stays inside the fabric rather than being pushed over the edge of the blade.
For a lightly dusty fan, a microfiber cloth may be enough on its own. Fold the cloth as it becomes dirty so collected dust is not simply transferred from one blade to another.
Use gentle pressure. Pulling hard on a blade is unnecessary and can disturb its position. Support it lightly when practical rather than bending or forcing it while you wipe.
Check the upper surface, both edges, and the area near the blade holder before moving on. A fan can look clean from below while still carrying a narrow band of dust along an edge.
Remove Sticky or Greasy Buildup
Fans near kitchens sometimes develop a film that dry dusting does not remove. Start by taking off all loose dust first; adding moisture too early can turn the surface layer into a muddy residue that takes more work to wipe away.
Next, check the manufacturer’s care instructions for the fan or blade finish. Some models allow a mildly damp cloth or mild cleaning solution, while others place tighter limits on moisture.
When damp cleaning is permitted, use a cloth that is lightly damp rather than wet enough to drip. Test a small, inconspicuous section first, then wipe the sticky area without saturating the blade.
Do not assume that vinegar or another homemade mixture is suitable simply because it is common in general household cleaning. Care requirements vary between finishes and models, so the fan’s own instructions are the safer reference when the material is uncertain.
After treating the residue, wipe away any remaining cleaner and leave the blade dry. If grime remains, repeat a gentle compatible treatment rather than immediately moving to an abrasive pad or stronger chemical.
Clean the Housing and Light Kit
After the blades are finished, wipe the outside of the motor housing with a dry microfiber cloth. Decorative grooves, vents, and raised details often hold dust that is easy to miss from below.
Do not spray cleaner directly at the housing, switches, light sockets, or other openings. If the exterior can be damp-cleaned, apply the permitted moisture to the cloth instead of spraying the fixture itself.
For a fan with a light kit, keep the light off and allow bulbs and glass parts to cool before touching them. Removable shades or globes can be cleaned separately when their material and manufacturer instructions allow it.
Make sure any washed or damp-cleaned component is completely dry before it goes back onto the fixture. Routine cleaning should stay on accessible exterior surfaces; opening the motor compartment or working on wiring is not part of normal fan cleaning.
Pull chains and other exposed control surfaces can be wiped carefully as well. Keep moisture away from openings where it could travel into electrical components.
Clean High Ceiling Fans Without Overreaching
The cleaning method stays essentially the same for a high fan, but the way you reach it changes. When the blades are well above comfortable hand height, an extendable microfiber or ceiling-fan duster is often the simplest option.
Cover furniture or bedding below the fixture if a substantial amount of dust is likely to fall. Then work across each blade with controlled passes rather than rapidly sweeping the duster back and forth.
If you use a stepladder, place it on a firm, level surface and position it so the fan is within comfortable reach. Climb down and move the ladder when necessary instead of leaning sideways to reach another blade.
Do not create extra height with chairs, boxes, stacked objects, or other improvised supports. If suitable equipment still does not give you a stable working position, use a longer cleaning tool or leave the job to someone equipped to reach the fixture safely.
A high fan may not be practical to clean with the pillowcase method, and that is fine. The goal is not to reproduce the exact technique used on a lower fan; it is to remove the buildup without creating an unsafe reach.
How Often Should You Clean a Ceiling Fan?
There is no single cleaning schedule that fits every room. A bedroom fan in a relatively low-dust space may stay clean much longer than a kitchen fan exposed to cooking residue or a frequently used fan in a home where dust builds quickly.
Instead of relying only on the calendar, inspect the upper surface of a blade periodically. When a visible layer begins to form, a quick dry cleaning is usually easier than waiting until the buildup becomes thick or sticky.
Rooms with pets, open windows, frequent fan use, or airborne cooking residue may need attention more often. The condition of the blades is a more useful trigger than forcing every fan in the house onto the same schedule.
Regular light cleaning also keeps the job simple. A thin layer usually takes only a few minutes to collect with a microfiber cloth or duster and rarely calls for damp cleaning.
Check the Fan Before Turning It Back On
Before restarting the fan, make sure every area you cleaned is dry and that any removable light shade or cover is seated correctly. Remove cloths, coverings, ladders, and cleaning tools from beneath the fixture.
Look across the blades for anything that appears shifted, loose, or out of place. If a blade was accidentally bent or a component no longer sits correctly, address that issue before operating the fan.
Once the fixture is dry, clear, and properly assembled, it can return to normal use. The next cleaning should be much easier if you remove light dust before it has time to develop into a heavy or sticky layer.
FAQ
Can I use vinegar to clean ceiling fan blades?
Do not assume vinegar is safe for every ceiling fan. Blade materials and finishes vary, and some manufacturers limit which liquids or cleaners can be used. Check the care instructions for your specific model before applying vinegar or another homemade solution.
Can I vacuum dust from a ceiling fan?
A vacuum with a soft brush attachment can help remove loose dust when the fan is easy to reach without stretching. Keep the attachment from pressing hard against the blades, and use a pillowcase or microfiber cloth when you want better control over where the dust goes.
Should I turn off the breaker before cleaning a ceiling fan?
For routine exterior dusting, switch the fan off and wait until the blades stop completely. If cleaning would involve electrical components, wiring, or opening the motor housing, that goes beyond normal surface cleaning and should be handled according to the manufacturer’s safety instructions.
What should I do if ceiling fan blades are still sticky after wiping?
Remove any remaining loose dust first, then use only a damp-cleaning method that is compatible with the blade finish. Repeat a gentle treatment rather than immediately switching to an abrasive pad or stronger chemical that could damage the surface.
Can ceiling fan light covers be washed separately?
Some removable glass shades or globes can be cleaned separately, but the correct method depends on their material and finish. Let the light cool before removal, follow the manufacturer’s care instructions, and make sure the component is completely dry before reinstalling it.